How to Butcher and Gut a Chicken
How to Butcher and Gut a Chicken
Chicken Tractor Build Plans
Click here for the plans to build our 8ft x 10ft chicken tractor – perfect for egg layers or meat birds!
Hi, I’m Carisa!

Come along with our family as we learn more about homesteading & self sufficiency as we go.
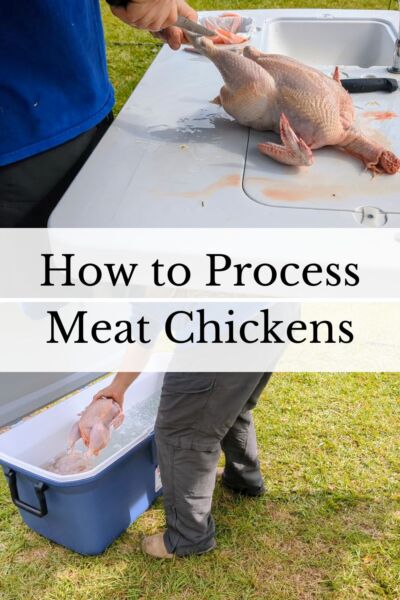
Learning to butcher and gut a chicken is a really simple process, but doing it well will make things much more enjoyable when it comes to actually cooking your home-raised chickens! There are many “correct” way to get the job done, but I will show you what we have found to be the best way for us over the years of raising and butchering our own meat chickens.
This is the fourth part of our 5 part How to Process Meat Chickens series, and in this post, I will be sharing with you:
- how to remove the extra feathers, feet, and neck of the chicken
- how to cleanly remove the innards of the bird
- how to keep & use as much of the chicken as possible
- ways and how long to chill the chicken before packaging
I highly encourage you to check out the other videos and posts in this series that I will be linking below for the full picture on how processing day works on our homestead! (Big thanks to my husband for voicing over this video with his expertise!)
How to Process Meat Chickens series
- Meat Chicken Processing Set Up, Equipment, and Tools
- How to Quickly Dispatch a Chicken
- How to Remove the Feathers From a Chicken (Using a Scalder and Plucker)
- How to Butcher and Gut a Chicken
- How to Use Poultry Shrink Bags for Freezing Meat Chickens
This post contains affiliate links marked with an *, which means I make a small commission at no extra cost to you. Thanks for supporting our homestead!
What if the plucker didn’t remove all the feathers of the chicken?
How good of a scald you get on the chicken will determine how well the plucker* is able to remove the feathers. Usually on the first meat chicken or two, you may have a few feathers left over as you get the hang of how long the birds need to remain in the scalder. The feathers should be very easy to remove by hand, but you will want to do this before moving on to cutting and gutting the bird. There can be some easy to miss feathers around and under the wing, so that’s always a good place to check.
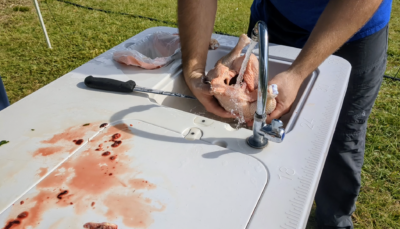
How do you remove the feet of a chicken?
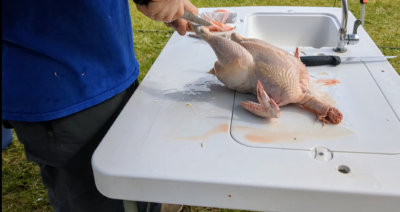
Once you’re happy with the overall cleanliness of the chicken, place it breast up on the table & cut the lower legs off through the hock joint. This is made much easier by a good sharp knife, and this is the one* we recommend for the butchering part of processing your own meat chickens.
The feet are great to keep for making broth, so don’t forget to keep them set aside if you would like to do that!
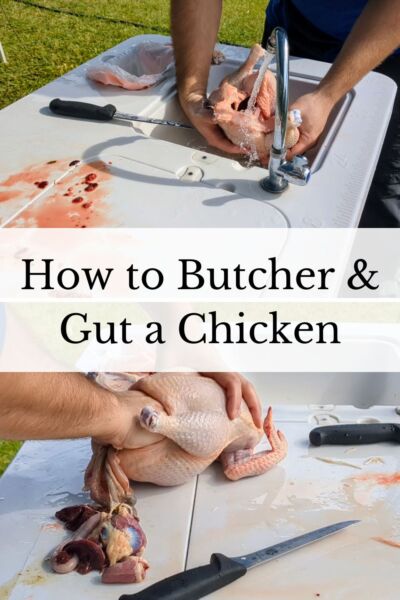
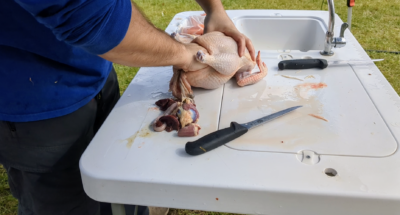
How do you remove the innards from a chicken?
Rotate the chicken and pinch + lift the skin on the neck of the chicken to cut the neck skin only. To keep things clean, the goal is to free the esophagus from the neck to make it easy to cleanly pull through the inner cavity of the bird. (Make sure to check out the video above for a better idea of how to do this!) Try your best not to cut the crop at the base of the neck. This crop holds whatever the chicken has been eating, so it can be a bit messy if you nick it with the knife.
Next, cut a small opening into the lower belly of the chicken, and use your hands to widen the opening. Reach inside and grab the innards of the bird. Keeping your hand above all the organs will more easily allow you to pull them out in one shot. Pull everything out, and make sure to scrape around the rib cage to find the lungs and remove those too. They can be easy to miss! When you’re pulling the organs out, don’t actually detach them from the chicken just yet.
Lastly, reach back into the chicken and grab the esophagus that you freed from the neck earlier. Pull this down and out the cavity while keeping it intact for cleanliness. Once it is out, cut out around the vent of the bird to free the innards from the body!
How do you remove the neck from a chicken?
We find it easiest to cut all around the base of the neck. From this point, it’s an easy twist and pull to remove it! If you’d like to save the neck for cooking, you can set it aside with the feet.
Do you need to rinse the chicken before chilling it?
Yes! After the innards are removed and the feet + neck are cut off, this is the time to get the chicken as clean as you can. You don’t need to do anything fancy or use a special product here. Just water is fine. But you will want to ensure that you rinse the bird thoroughly inside and out. You may need to rinse and dump the water from the cavity a couple times before it finally runs clean. This is also a great time to remove any additional feathers you may have missed earlier!
What can you do with the organs of a chicken?
There are many parts of the chicken that you can keep and eat if you choose. There can be great nutrition found in things like the liver! All of that is up to you and your preferences. If you would rather not save the organs to eat, another great option is to feed them to your dogs or even to your egg laying flock of chickens!
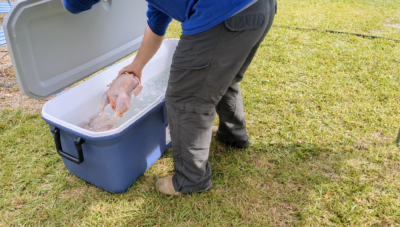
How do you chill a chicken after butchering?
Once you’re finished processing the meat chickens, you’ll need to chill them for a few hours up to a few days. There are a couple ways to do this. The first is to chill the birds in a fridge for a few days. This is the most time consuming, but it may be better for you if you only have a few chickens that you have processed at a time. Another option is to speed up the chilling time by placing the chickens in a large sink or cooler filled with water and lots of ice.
The cooler* method is our favorite because it keeps the entire operation outside which keeps messes out of the house! Whether you do this in a cooler or in a sink filled with ice water, we aim to chill the birds for 2-4 hours before packaging (we will discuss our method of packaging in the last post of the series!).
Supplies We Recommend
Game Table* – You’re going to need some sort of surface on which to gut the bird, and we really like using a game table. This table is large enough for two people to be working at the same time, and has a place to hook up a hose to be able to use the sink feature. This feature is really important when it comes to thoroughly rinsing the chickens prior to putting them in the cooler.
Canopy* – If you’re processing meat birds outside, having some type of canopy for shade and protection from rain is very helpful.
Knife* – We really like this straight flexible boning knife for the butchering process. We keep two of the boning knives on hand in case we have someone helping with the gutting and butchering on processing day.
Cooler* and Ice – This cooler is very large and holds can easily hold 20+ meat birds.